

How to Set Up a Sensory Table for Toddlers: Step-by-Step
Table of Contents
- What You'll Need Before You Start
- Choosing the Right Sensory Table for Your Toddler
- Sensory Bin Filler Ideas for Toddlers
- Step-by-Step Setup for a Sensory Table
- How to Manage Sensory Bin Mess
- Benefits of Sensory Play for Early Development
- Sensory Play for Neurodivergent Toddlers
- Storage and Organisation Systems
- Common Mistakes to Avoid
- Frequently Asked Questions
Last Updated: September 13, 2026
What You'll Need Before You Start
Setting up a sensory table for toddlers takes about 20 minutes and a handful of basic supplies. Get these ready first and the whole process runs smoothly: a shallow plastic tub or dedicated sensory table, a waterproof mat or old towel, 2 to 3 kilograms of a dry filler such as rice or chickpeas, a few scooping tools, and a small dustpan for cleanup. This guide from Lulliyotoys walks you through every step, from choosing the right container to keeping the mess under control.
It helps to think of a sensory table as a small, contained world where your toddler can scoop, pour, dig and discover without you hovering. Getting that world right comes down to preparation, not luck. Below, you'll learn exactly how to set one up, what fillers work best, and the mistakes that turn five minutes of joy into an hour of sweeping.
Raising Children Network guide to play and learning
Choosing the Right Sensory Table for Your Toddler
The best sensory table for a toddler is one that sits at roughly waist height when your child stands, has a wide, shallow basin, and either locks or lifts out for emptying. Height matters more than brand. A table that's too tall forces your toddler to reach awkwardly, and one that's too low leads to kneeling and tipping.
You have three main options:
- Dedicated sensory tables: Built for the job, often with legs and a removable tub. Best if you have floor space and want something that looks intentional in a playroom.
- Shallow plastic tubs: A large under-bed storage container on the floor or a low table. Cheap, portable, and easy to hose down outside.
- DIY setups: A sturdy low table with a deep tray, or a paddling pool for water play in warmer months.
Whatever you choose, check the edges for sharp moulding and confirm the material is food-grade or clearly marked non-toxic, since toddlers will mouth everything. If you want a purpose-built option that doubles as fine motor practice, a wall-mounted activity panel like the Crocodile Wall Activity Board keeps sensory input off the floor entirely.

Sensory Bin Filler Ideas for Toddlers
Dry fillers are the easiest starting point because they vacuum up and store well. The classic sensory bin filler ideas for toddlers include plain rice, dried chickpeas, lentils, and uncooked pasta shapes. Each offers a different texture, weight and sound, which is exactly the point: variety builds tactile exploration and motor coordination.
Here are reliable options by category, with practical notes on cleaning and storage that most guides skip:
| Filler | Best For | Cleanup Effort | How to Sanitise | Storage Life |
|---|---|---|---|---|
| Rice or lentils | Scooping, pouring | Low (vacuum) | Spread on a tray in direct sun for 2-3 hours, or freeze in a sealed bag for 48 hours to kill pantry pests | 3-6 months in a sealed container |
| Dried chickpeas | Grasping, sorting | Low | Same as rice; discard if they smell musty or show mould | 3-6 months |
| Water with cups | Pouring, water play | Medium (towel) | Empty and air-dry the tub daily; scrub with hot soapy water every 2-3 days | Replace water daily |
| Playdough or cloud dough | Moulding, squeezing | Medium | Homemade playdough keeps 2-3 weeks in the fridge; discard if sticky or discoloured | 2-3 weeks refrigerated |
| Kinetic sand | Digging, shaping | Medium (mat) | Sift out debris; air-dry if clumpy; replace when it stops holding shape | 6-12 months |
Rotate fillers every week or two to keep toddler engagement high. A bin rotation also stops the novelty wearing off, which is the main reason sensory setups get abandoned. For water play, always supervise directly and never leave a filled tub unattended, even for a moment.
Storage and organisation that actually works
Good storage is what keeps a sensory table in rotation instead of in the garage. The rule is simple: every filler lives in a labelled, sealed container, and every tool has a home. Clear containers with clip-lock lids keep rice and chickpeas dry and pest-free, and let you see what you have at a glance.
A workable system:
- One sealed tub per filler, labelled by type and date opened.
- A shallow basket for tools, stored with the table.
- A dedicated shelf or cupboard at toddler height for the current rotation only.
- Everything else stored out of reach.
Rotate two or three fillers at a time and store the rest. This keeps the play area tidy and makes bin rotation a two-minute job rather than a production.
Kidsafe home safety guidance
Step-by-Step Setup for a Sensory Table
Here's the practical sequence. Total time is about 20 minutes, and the whole thing is beginner-level.
What you'll need: sensory table or tub, waterproof mat, filler, 3 to 4 tools, dustpan.
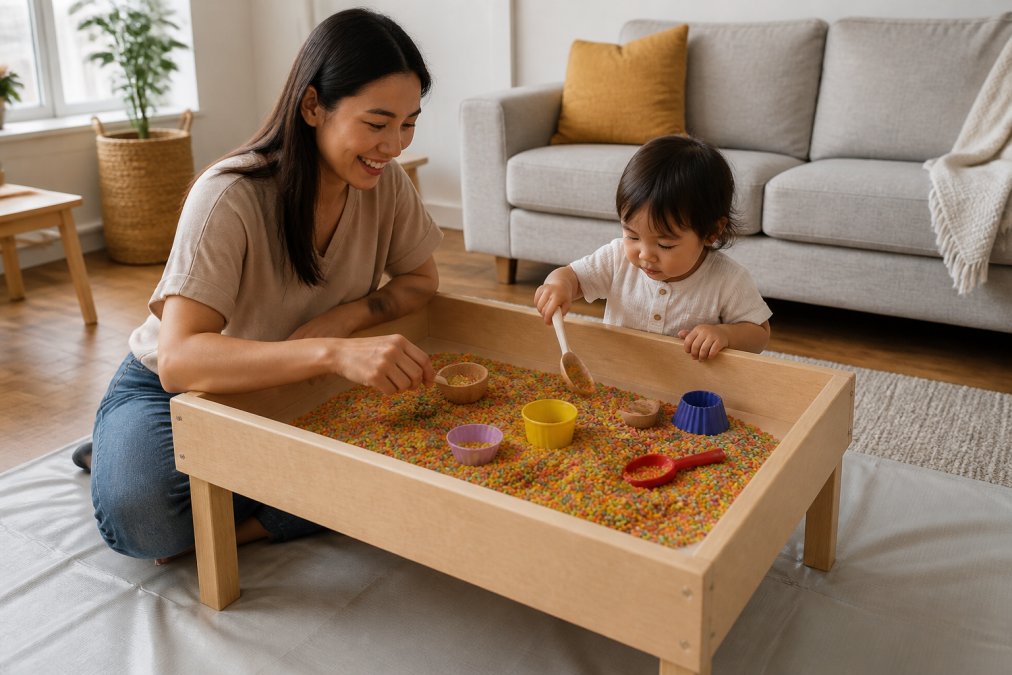
Step 1: Pick a Safe Spot and Prepare the Area
Choose a spot on a hard floor, away from stairs, and within your direct line of sight. Lay a waterproof mat or old towel underneath to catch spills. Keep the area clear of small choking hazards and anything breakable.
Height check: The table surface should sit at roughly waist height when your toddler stands, about 45-50 cm for most two-year-olds. If the table is too tall, your child will reach awkwardly and tip the bin; too low and they'll kneel and lean in, which leads to spills.
Step 2: Add the Base Filler and Tools
Pour in just 2 to 3 centimetres of filler. More than that and toddlers struggle to scoop; less and there's nothing to dig into. Add a few tools: a scoop, a small cup, a spoon and a container to fill. Resist adding everything at once. A common mistake is overfilling the bin, which overwhelms rather than engages.
Tool selection by age:
- 12-18 months: Large scoops, wide-mouth cups, no small parts.
- 18-24 months: Add spoons, small bowls, and a funnel.
- 24-36 months: Introduce tongs, tweezers, and sorting containers.
Step 3: Introduce the Table to Your Toddler
Sit beside your toddler, not across from them, and model one action: scoop, then pour. Let them copy. Stay close for the first few sessions, especially if your child still mouths objects. Supervision is the single most important safety measure at a sensory table.
Troubleshooting common issues:
- Toddler throws filler: Redirect to a throwing game with a soft ball, or swap to a heavier filler like chickpeas that is less satisfying to throw.
- Toddler eats the filler: Switch to taste-safe options like plain cooked pasta or mashed banana, and supervise closely.
- Toddler loses interest in 2 minutes: Reduce tools to one, sit with them, and model a new action like hiding a toy in the filler.
- Toddler refuses to touch the filler: Offer tools only, or start with a dry, warm filler like rice at room temperature.
Raising Children Network guide to play and learning
How to Manage Sensory Bin Mess
The mess is the part most guides skip, and it's the reason sensory tables get packed away. The trick is to build cleanup into the setup itself rather than treating it as a separate chore. A mat under the table, a dustpan within reach, and a firm "we keep the rice in the bin" rule handle most of it.
A few habits that actually work:
- Place the table on a hard floor, never carpet, for dry fillers.
- Keep a small dustpan and brush clipped to the table leg.
- Use a shallow tray inside the bin so toddlers can pour without aiming at the floor.
- End sessions by having your toddler help scoop leftover filler back into its storage container. It becomes part of the play.
For water play, keep a towel folded beside the table and swap the water daily to prevent it going stale. A cleanup strategy you actually follow beats an elaborate one you abandon.
Benefits of Sensory Play for Early Development
The benefits of sensory play for early development come down to repetition and variety. Every scoop, pour and squeeze builds fine motor skills, hand-eye coordination and the small muscles that later support pencil grip. Tactile exploration also feeds sensory processing, helping toddlers make sense of different textures, temperatures and weights.
Open-ended play matters here. A bin with rice, scoops and cups has no "right" answer, so toddlers invent their own goals: filling, emptying, sorting, hiding. That freedom supports cognitive development and imaginative play in ways a single-purpose toy can't. Play-based learning like this is why sensory tables earn a permanent spot in early childhood settings, not just homes.
Australian Government early childhood learning framework
Sensory Play for Neurodivergent Toddlers
Sensory play can be especially valuable for neurodivergent toddlers, but it needs adjusting. Some children seek sensory input and dive straight in; others are overwhelmed by certain textures and need a slower introduction. Neither response is wrong, and the setup should flex to match.
Practical adjustments that help:
- Start with one dry filler and one tool, then add more over weeks.
- Offer a "no-hands" option: a scoop or spoon for children who dislike touching the filler.
- Keep the environment quiet and predictable, with the same spot every time.
- Watch for signs of overload and let your child leave the table freely.
The goal is a sensory-rich environment your child controls, not one that controls them. If your toddler has a diagnosed sensory processing difference, work with their occupational therapist on specific fillers and textures.
Storage and Organisation Systems
Good storage is what keeps a sensory table in rotation instead of in the garage. The rule is simple: every filler lives in a labelled, sealed container, and every tool has a home. Clear containers with clip-lock lids keep rice and chickpeas dry and pest-free, and let you see what you have at a glance.
A workable system:
- One sealed tub per filler, labelled by type.
- A shallow basket for tools, stored with the table.
- A dedicated shelf or cupboard at toddler height for the current rotation only.
- Everything else stored out of reach.
Rotate two or three fillers at a time and store the rest. This keeps the play area tidy and makes bin rotation a two-minute job rather than a production.
Common Mistakes to Avoid
The biggest mistake is overfilling the bin. Toddlers need room to scoop, and a bin filled to the brim just spills faster. Keep the filler shallow.
Other mistakes that trip parents up:
- No mat or tray. Cleanup becomes a nightmare and the table gets retired.
- Too many tools at once. Choice overload kills engagement. Start with three or four.
- Leaving water unattended. Water play always requires direct supervision.
- Skipping the mouthing check. If your toddler still puts everything in their mouth, stick to large, non-toxic, toddler-safe fillers and supervise closely.
- Never rotating. The same filler for months means a bored toddler and an abandoned table.
Fix these and the sensory table becomes one of the lowest-effort, highest-return play setups in your home.
Setting up a sensory table that actually gets used comes down to the right container, the right filler and a cleanup system you'll stick to. Lulliyotoys designs Montessori-inspired toys and sensory tools that make this easier, from multi-sensory activity panels to hands-on learning boards that build fine motor skills through purposeful play. Explore the Montessori Toddler Busy Board and the 5 Activity Stackers to round out your toddler's sensory setup. Get started with Lulliyotoys and build a play space that grows with your child.


Frequently Asked Questions
What can I put in a sensory table for toddlers?
Safe fillers include dry materials like rice, lentils, sand, and oats, or wet materials like water and soapy foam. Always choose non-toxic, age-appropriate items and supervise closely. For toddlers who mouth everything, stick to edible options such as plain yoghurt or mashed potato. Rotate fillers every one to two weeks to keep engagement high and match your child's current interests.
How do I manage the mess when setting up a sensory table?
Place a washable mat or old sheet under the table to catch spills. Use a shallow tray with raised edges and offer tools like scoops and funnels to direct play. Keep a small dustpan and cloth nearby for quick clean-ups. For water play, add a towel underneath. Establish a clear 'keep it in the bin' rule and model scooping back into the container. A quick tidy after each session prevents build-up.
What are the best non-toxic fillers for a toddler sensory table?
Choose food-grade items like rice, pasta, oats, and beans, which are non-toxic if tasted. For wet play, plain water with a drop of food colouring is safe. Avoid small beads, marbles, or anything that could be a choking hazard. If using sand, opt for play sand labelled non-toxic. Always check for allergies and supervise. Natural materials like pinecones and leaves are also safe if cleaned.
How often should I rotate the items in a sensory table?
Rotate fillers and tools every one to two weeks, or when your toddler seems bored. Fresh materials spark curiosity and support different skills. You can also rotate based on themes, such as farm animals or ocean life. Store unused fillers in airtight containers for easy swapping. Keep a few core tools like scoops and cups available at all times to maintain familiarity.