

Montessori Sensory Bin Ideas for One Year Olds
Table of Contents
- Why Montessori Sensory Play Benefits One Year Olds
- Safe Sensory Bin Fillers for Toddlers: What to Use and Avoid
- How to Set Up a Sensory Bin for Your One Year Old
- What You'll Need
- Step 1: Choose the Container [Time: 2 minutes]
- Step 2: Add the Filler [Time: 2 minutes]
- Step 3: Place the Tools [Time: 1 minute]
- Step 4: Set the Boundary [Time: 2 minutes]
- Step 5: Let Them Lead [Time: 5-10 minutes]
-
10 Montessori Sensory Bin Ideas for One Year Olds
- 1. Rainbow Rice and Scooping
- 2. Water Play with Floating Toys
- 3. Texture Exploration with Fabric Scraps
- 4. Cooked Pasta and a Slotted Spoon
- 5. Oats and a Small Scoop
- 6. Large Sponges and Water
- 7. Soft Silicone Shapes
- 8. Cooled Cooked Carrots
- 9. Shallow Sand Tray with a Wooden Rake
- 10. Large Wooden Blocks for Grasping and Transferring
- Preventing Dumping and Throwing: Troubleshooting Behavioural Challenges
- Budget-Friendly vs. Montessori-Aligned Materials
- Supervision and Safety Guidelines for Sensory Play
- Montessori Toys That Complement Sensory Bin Play
- Frequently Asked Questions
Last Updated: September 15, 2026
Why Montessori Sensory Play Benefits One Year Olds
Montessori sensory bin ideas for one year olds work because a one-year-old learns through their hands, not through instruction. At this age, a toddler's primary occupation is tactile exploration: grasping, transferring, scooping and pouring, and testing what happens when objects move. This guide from Lulliyotoys walks through safe fillers, setup, ten bin ideas, and how to handle the dumping phase.
Sensory play is structured, hands-on activity that lets a child explore texture, weight, sound and movement with their whole body. Unlike a screen or a battery-operated toy, a sensory bin invites the child to lead.
How Sensory Play Supports Developmental Milestones
Between twelve and twenty-four months, most toddlers are working on a predictable set of skills: fine motor skills, hand-eye coordination, early problem-solving, and the beginnings of independent play. A sensory bin targets all four at once, which is why it earns a permanent spot in a Montessori-aligned play space.
The Montessori approach adds one rule: the adult sets up the environment, then steps back. You choose the filler, the tools and the container. Your child chooses what to do with them.
Which Milestone Each Bin Actually Targets
Most articles list activities without saying what skill each one builds. That is the gap this section fills. Here is the mapping, so you can choose a bin deliberately rather than by colour:
| Bin type | Primary milestone | What to watch for |
|---|---|---|
| Rice and scooping | Hand-eye coordination; palmar-to-pincer grip | Child pinches individual grains instead of raking |
| Water and floating toys | Cause-and-effect reasoning; wrist rotation | Child pushes toy under and waits for it to pop up |
| Fabric scraps | Tactile discrimination; receptive vocabulary | Child returns to one texture repeatedly |
| Cooked pasta and slotted spoon | Tool use; problem-solving | Child adjusts scoop angle after a failed attempt |
| Oats and small scoop | Bilateral coordination | One hand steadies the bowl while the other scoops |
| Sponges and water | Grip strength; squeezing | Child transfers water from sponge to bowl |
| Silicone shapes | Safe mouthing; colour recognition | Child groups two colours without prompting |
| Cooked carrots | Pincer grasp; self-feeding | Child picks up a baton with thumb and forefinger |
| Sand and rake | Wrist control; pre-writing strokes | Child makes deliberate lines rather than random sweeps |
| Wooden blocks | Palmar grasp; deliberate release | Child places a block rather than dropping it |
A common pattern is that a child masters one column before moving to the next. If your child is still raking rice with a whole hand, they are not ready for the sand tray, and that is fine. The bin should be slightly harder than what they can already do, not much harder.
Cognitive and Fine Motor Skill Development Through Play
Scooping and pouring build the same grip and wrist control a child later needs for holding a spoon and, eventually, a pencil. Texture variety feeds sensory processing, while open-ended play encourages cause-and-effect thinking: tip the cup, the rice falls, the scoop fills again.
Raising Children Network on toddler development notes that toddlers learn best through everyday, hands-on experiences rather than structured lessons. A bin is that idea in a tray.
What Makes It Montessori Rather Than Just Sensory
The word "Montessori" gets attached to any tray of rice, but the method adds three specific things that ordinary sensory play often skips:
- A control of error. The bin itself tells the child when something went wrong, the pasta falls through the slotted spoon, the water overflows the cup. You do not need to correct them; the material does.
- Isolation of difficulty. A Montessori bin changes one variable at a time. If your child is learning to scoop, you give them one filler and one tool, not five of each. That is why the setup steps below cap the filler at 5 cm and the tools at three.
- A prepared environment. The tray, the mat, the low shelf, everything is sized so the child can do it themselves. A one-year-old cannot fetch a bin from a high shelf, so the shelf height is part of the activity.
Safe Sensory Bin Fillers for Toddlers: What to Use and Avoid
The safest fillers for a one-year-old are large, taste-safe, and non-toxic: cooked and cooled pasta, plain oats, water, large fabric scraps, and soft silicone shapes. Skip anything small enough to swallow, anything dusty, and anything that turns slippery when wet.

Edible Fillers for Mouthing Babies
If your one-year-old still puts everything in their mouth, build the whole bin from edible fillers so a taste test is harmless. Good options include:
- Cooked and cooled spiral pasta
- Plain rolled oats or baby cereal
- Soft cooked carrot pieces, cooled
- Water with large floating toys
- Mashed, cooled pumpkin or potato for a messy-play session
Allergy-Conscious and Non-Toxic Alternatives
If your household manages food allergies, avoid food-based fillers entirely and use large fabric scraps, soft silicone shapes, or water instead. These carry no ingestion risk and no allergen exposure, and they clean up easily.
For any filler you do buy, check that it is labelled non-toxic and free from loose dyes or coatings that flake. A quick rinse test tells you a lot: if colour runs off into water, it does not belong in a bin.
How to Set Up a Sensory Bin for Your One Year Old
Setting up a sensory bin for a one-year-old takes about ten minutes and four decisions: container, filler, tools, and location. Get those right and the bin does the rest.
Total Time: 10-15 minutes Difficulty: Beginner
What You'll Need
- A shallow container, roughly 30-40 cm wide, with a rim your child can reach over
- One filler, no more than 5 cm deep to start
- Two or three tools: a scoop, a cup, a small spoon
- A waterproof mat or towel underneath
- A nearby adult
Step 1: Choose the Container [Time: 2 minutes]
Use something shallow and wide. A deep bucket forces your child to reach over a high wall and tips easily. A shallow tub or tray keeps the filler visible and the tools within reach.
Expected Result: Your child can see and reach the whole bin from a seated position.
Step 2: Add the Filler [Time: 2 minutes]
Start with a thin layer, around 3-5 cm. A full bin invites sweeping and dumping; a shallow one invites scooping. You can always add more later.
Step 3: Place the Tools [Time: 1 minute]
Offer two or three tools, not ten. One scoop, one cup, one spoon is plenty for a one-year-old.
Step 4: Set the Boundary [Time: 2 minutes]
Place the bin on a mat and sit beside it. Say the rule once, simply: "The rice stays in the tray." Then model it.
Step 5: Let Them Lead [Time: 5-10 minutes]
Sit nearby without directing. If they scoop, scoop alongside them. If they dump, redirect calmly and show the scoop again.
Expected Result: Five to ten minutes of focused play, which is a full session at this age.
Essential Tools and Containers
The best tools for a one-year-old are wooden or silicone, oversized, and easy to grip. Wooden scoops and spoons are heavier than plastic, which makes them easier for small hands to control. Silicone cups are soft if they get waved around.
A shallow wooden tray or a low-sided tub works better than a deep plastic bin. Pair it with a waterproof mat, and keep a small brush nearby for the inevitable spill.
10 Montessori Sensory Bin Ideas for One Year Olds
Here are ten sensory bin ideas for one year olds, all built from safe fillers and simple tools. Each one names the developmental milestone it targets, so you can pick the bin that matches where your child is right now rather than guessing.
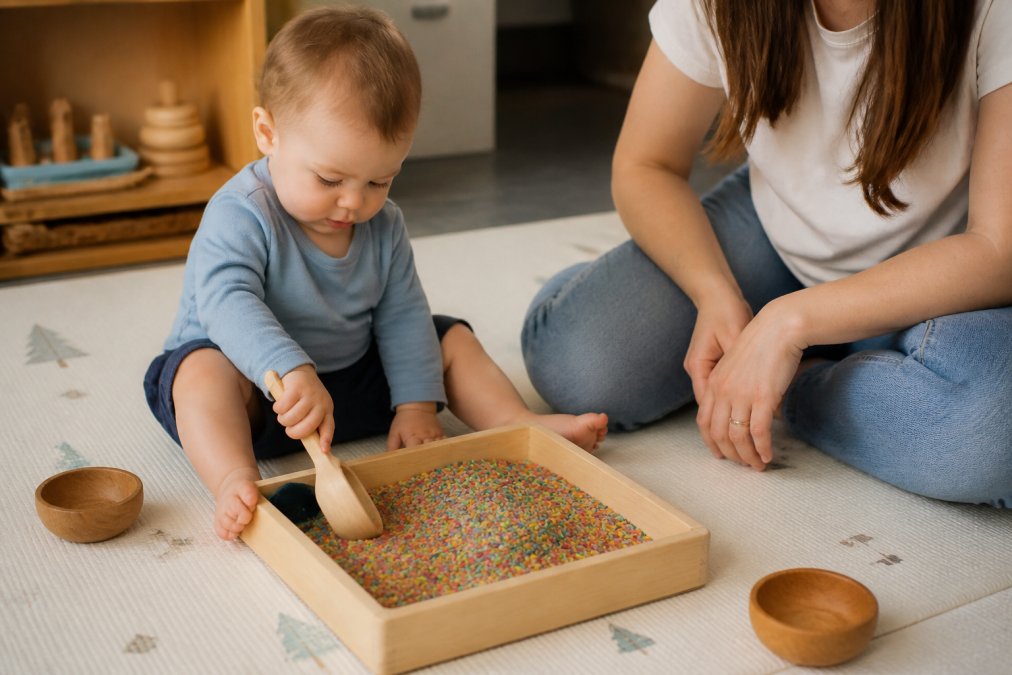
1. Rainbow Rice and Scooping
Milestone: hand-eye coordination and the palmar-to-pincer grip transition.
Colour plain rice with a few drops of food colouring, spread it out to dry fully, then tip it into a shallow tray with a wooden scoop and a small cup. The scooping and pouring motion builds hand-eye coordination, and the colour contrast keeps a one-year-old engaged longer than plain rice. Watch for the moment your child stops raking with a whole hand and starts pinching individual grains, that is the pincer grasp emerging, and it is the same grip they will later use for a pencil.
Dry fully before use. Damp rice clumps and grows mould.
2. Water Play with Floating Toys
Milestone: cause-and-effect reasoning and wrist rotation.
Fill a shallow tray with 3-4 cm of water and add two or three large floating toys. Water play is the easiest mess-free option if you place the tray on a towel and keep the depth shallow. When your child pushes a toy under and lets it pop back up, they are running a cause-and-effect experiment. When they turn a cup over to pour, they are rotating the wrist, a precursor to self-feeding. It also doubles as a calming activity before nap time.
3. Texture Exploration with Fabric Scraps
Milestone: tactile discrimination and vocabulary building.
Fill a bin with large squares of different fabrics: soft fleece, rough hessian, smooth cotton, crinkly tulle. No tools needed. Your child pulls, gathers and compares. This is the safest bin on the list for a heavy mouther, because fabric cannot be swallowed. Name each texture as they touch it, "soft," "scratchy," "smooth", because one-year-olds attach words to sensations long before they can say them.
4. Cooked Pasta and a Slotted Spoon
Milestone: tool use and transfer.
Cook spiral pasta until soft, cool it completely, and offer it with a slotted spoon and a second empty bowl. The slotted spoon introduces a new problem: the pasta falls through unless the child scoops with the right angle. That is early problem-solving, and it is the same trial-and-error loop Montessori practical life activities are built on. Cooked pasta is also one of the few fillers a mouthing toddler can safely taste.
5. Oats and a Small Scoop
Milestone: bilateral coordination (two hands working together).
Plain rolled oats in a shallow tray with a small scoop and a cup. Oats are heavier than rice, so they demand more control and give more resistance, useful for a child still learning to steady one hand while the other scoops. This is the bin to reach for when your child has mastered rice and needs a harder version of the same motion.
6. Large Sponges and Water
Milestone: grip strength and squeezing.
Cut large cellulose sponges into palm-sized blocks and float them in 3-4 cm of water. Squeezing a saturated sponge is one of the most efficient grip-strength exercises available at this age, and it is self-motivating because water comes out. Pair with a small bowl so your child can squeeze the water from one container to another.
7. Soft Silicone Shapes
Milestone: grasping, mouthing safely, and shape recognition.
Fill a shallow tray with large soft silicone shapes in two or three colours. No tools. This is the bin for a child who is still mouthing everything, because silicone is inert and cannot break into small pieces. Sort them by colour aloud as your child handles them, you are planting the vocabulary for colour matching months before they can do it themselves.
8. Cooled Cooked Carrots
Milestone: pincer grasp and self-feeding practice.
Cook carrot batons until soft, cool them fully, and place them in a shallow bowl with a small spoon. This bin doubles as a snack, which makes it the most practical option on the list. Picking up a soft carrot baton uses the same pincer grip as picking up a pea, so the bin is quietly rehearsing self-feeding.
9. Shallow Sand Tray with a Wooden Rake
Milestone: wrist control and pre-writing strokes.
Use play sand in a shallow tray, no more than 3 cm deep, with a small wooden rake and a smooth stone. Raking leaves lines in the sand, which is the earliest form of mark-making, the same motion that later becomes drawing and writing. Keep the tray shallow and the sand damp enough to hold a line but not wet enough to clump.
10. Large Wooden Blocks for Grasping and Transferring
Milestone: palmar grasp, release, and early stacking.
Fill a shallow tray with large wooden blocks, big enough that a whole hand wraps around them. The skill here is release: a one-year-old can grasp long before they can deliberately let go, so transferring a block from tray to bowl is genuine work. Once release is reliable, stacking follows.
Preventing Dumping and Throwing: Troubleshooting Behavioural Challenges
Dumping and throwing are not misbehaviour at this age. They are the experiment. Your one-year-old is testing gravity, sound and your reaction, all at once. The goal is not to stop the behaviour but to redirect it.
Try these fixes, in order:
| Problem | Likely Cause | Fix | Expected Impact |
|---|---|---|---|
| Whole bin tipped over | Bin too deep or too light | Switch to a shallow, weighted tray | Fewer full dumps |
| Filler thrown across room | Too much filler, no target | Reduce to 3-5 cm, add a second empty bowl | Throwing becomes pouring |
| Child loses interest in 2 minutes | Too many tools or wrong filler | Cut to two tools, try a new texture | Longer focused play |
| Child eats the filler | Still in the mouthing stage | Switch to edible or fabric fillers | Removes the risk entirely |
If dumping continues, give it a home. Place an empty bowl beside the bin and say, "Tip it here." You are teaching the motion rather than banning it.
Budget-Friendly vs. Montessori-Aligned Materials
You do not need to spend much to run a good sensory bin. Most of the best fillers come from the pantry: rice, oats, pasta, water, and fabric scraps you already own.
Where it is worth spending is on tools and toys that survive daily use and get handed down. A well-made wooden scoop, a sturdy stacking toy, or a wooden shape sorter will outlast three plastic versions and holds its value as a learning tool as your child's skills grow.
For families who want toys that work alongside a bin rather than instead of one, Lulliyotoys stocks Montessori-inspired pieces built for exactly this stage, including a toddler busy board ($30.00) that builds fine motor skills through hands-on activity, and the I'm Toy 5 Activity Stackers ($60.00), which combines stacking, nesting and practical life activities in one wooden set.

Supervision and Safety Guidelines for Sensory Play
An adult must stay within arm's reach for the entire session (kidsafe.com.au). A one-year-old cannot be left alone with a sensory bin, even one built entirely from edible fillers, because the risk at this age is not the material itself but what a child does with it.
Before every session, check the bin for:
- Any item small enough to fit inside a cardboard toilet roll tube (that is your choke-risk test)
- Filler that has clumped, spoiled or grown mould
- Tools with cracks, splinters or loose parts
- Water that has been sitting out
After the session, tip the filler out, wipe the tray, and store it dry.
Montessori Toys That Complement Sensory Bin Play
Frequently Asked Questions
What can I put in a sensory bin for a 1 year old?
For one year olds, stick to taste-safe fillers because mouthing is still common. Cooked and cooled pasta, plain oats, rice, water, and soft fabric scraps all work well. Avoid small hard items like beads or raw beans that pose a choking risk. You can also use large wooden scoops, silicone cups, and chunky toys to encourage scooping and pouring without a hazard.
How do I introduce a sensory bin to a one year old using Montessori principles?
Start with one simple filler and one tool, placed in a low tray your child can reach independently. Sit beside them and model scooping or pouring without directing the play. Let them explore at their own pace. Montessori sensory play benefits come from open-ended, child-led exploration, so resist the urge to correct or guide too much. Add new elements only when interest fades.
Are there specific Montessori toys that complement sensory bin play?
Yes. Wooden stacking toys, shape sorters, and busy boards all pair well with sensory bins. For example, the Montessori Toddler Busy Board ($30.00) builds fine motor skills that carry over into bin play. The I'm Toy 5 Activity Stackers ($60.00) add texture and practical life elements. Rotating these toys alongside your sensory bin keeps engagement high and supports different developmental skills.
How can I keep sensory play mess-free at home?
Place a large mat or old sheet under the bin to catch spills. Use a shallow tray with raised edges rather than a deep container. Start with dry fillers like oats or rice, which are easier to sweep than water. Keep a small dustpan and cloth nearby for quick clean-ups. Supervised play and clear boundaries, like keeping the bin on the mat, also reduce mess significantly.
The tricky part of sensory play is not the setup. It is finding toys that survive the mouthing, the throwing and the daily use without falling apart or losing their developmental value. Lulliyotoys builds Montessori-inspired toys for exactly this stage, with non-toxic materials, smooth edges and designs that grow with your child. Browse the collection and find the pieces that fit your one-year-old's next milestone.